Pottery One Beginning Assignments
"Rectangular Prism Pinch Pot Box"
Directions:
Follow demo, and one on one student demo
Directions:
Follow demo, and one on one student demo
|
Rubric Rectangular Prism Box
|
Grading scale
A full point is earned by meeting each requirement on the rubric. There will be 6 requirements for each art project. A half point (.5) is earned by attempting and not meeting the requirement. Zero points are earned for an unsatisfactory attempt meeting the requirements. The grading scale starts at 100 and ends at 50. I gave you 50 points so do your best. Points Grade 6 100 5.5 96 5 92 4.5 88 4 84 3.5 80 3 76 2.5 72 2 68 1.5 64 1 60 .5 56 0 50 |
"Do not forget to post all your artwork, grades, and reflections on your blog page"
------------------------------------------------------------------------------------------------------------------------------------------------------------------------------------------------------------------------------------------------------------------------------------------------------------------------------------------------------------------------------------------------------------------------------------------------------------------------------------------------------------------------------------------
------------------------------------------------------------------------------------------------------------------------------------------------------------------------------------------------------------------------------------------------------------------------------------------------------------------------------------------------------------------------------------------------------------------------------------------------------------------------------------------------------------------------------------------
"Cultures Around the World Half Circle Pinch Pot Box"
- Research and design a pinch pot box inspired your favorite cultural. Here are some examples: Japanese, Chinese, Haida, Maori, Samoa, India, South America, Israel, Celtic, Oaxacan, and Ancient Greece these are just a few to choose from you may pick your own.
- Start by researching cultures from around the world and the patterns they put on their pottery. Discover one that inspires you. (ex google search Maori patterns, Japanese patterns on pottery)
- Begin by making sketches of patterns from your culture. If you can draw it you will be able to carve the design latter on your pottery.
- You will need to simplify patterns that are complex in your sketches.
- Drawing your patterns successfully only makes it easier later.
- When you have finished your drawings photograph them and save them to your computer.
- Start by making your pinch pot box.
- Your box should be smooth on the inside and out.
- Shape the box into a half circle.
- Start with the potato shape and paddle the corners in until they become round.
- Paddle the bottom flat.
- Paddle the sides flat.
- Paint your box with one color of under-glaze.
- Very lightly draw the lines of your patterns.
- Use a small carving tool to scratch away the areas around your pattern.
- The exposed clay will turn white when the project is fired.
- Your project will be two colors white and the color of your choice.
- When you are finished photograph your box.
- Post your photographs of all your sketches, finished project, grade, and reflections.
|
Rubric
|
Grading scale
A full point is earned by meeting each requirement on the rubric. There will be 6 requirements for each art project. A half point (.5) is earned by attempting and not meeting the requirement. Zero points are earned for an unsatisfactory attempt meeting the requirements. The grading scale starts at 100 and ends at 50. I gave you 50 points so do your best. Points Grade 6 100 5.5 96 5 92 4.5 88 4 84 3.5 80 3 76 2.5 72 2 68 1.5 64 1 60 .5 56 0 50 |
"Do not forget to post all your artwork, grades, and reflections on your blog page"
------------------------------------------------------------------------------------------------------------------------------------------------------------------------------------------------------------------------------------------------------------------------------------------------------------------------------------------------------------------------------------------------------------------------------------------------------------------------------------------------------------------------------------------
------------------------------------------------------------------------------------------------------------------------------------------------------------------------------------------------------------------------------------------------------------------------------------------------------------------------------------------------------------------------------------------------------------------------------------------------------------------------------------------------------------------------------------------
Obelisk / Pyramid Pinch Pot Box and Texture
Directions:
Your Choice
Choose between making a Obelisk or Pyramid
You will carve a brick pattern on the form when you are finished.
Making the Oblisk
Using the pinch technique.
Make two long pinch pots and join them to make a potato shape.
Paddle (lightly) the top corners into a pyramid. (just the top)
Paddle the sides so they line up with the edges of the pyramid on top.
Use your fettling knife to smooth and keep your edges crisp.
Know add your feet to the bottom of the box.
Cut your box open and smooth the inside.
Making the Pyramid
Using the pinch technique.
Make two bowl shaped pinch pots and join them to make a egg shape.
Paddle the small end of the pinch pot round like the top off an egg.
Paddle the bottom round using the same technique.
Make sure the pinch pot is symmetrical as possible.
Paddle the bottom square.
Paddle the sides into triangles
Paddle the sides so they line up evenly.
Use your fettling knife to smooth and keep your edges crisp.
Know add your feet to the bottom of the box.
Cut your box open and smooth the inside.
Carve a simple and light chip pattern on your box.
Click on the following links below to learn about the forms you are making
|
Rubric Pinch Pot Obelisk / Pyramid
|
Grading scale
A full point is earned by meeting each requirement on the rubric. There will be 6 requirements for each art project. A half point (.5) is earned by attempting and not meeting the requirement. Zero points are earned for an unsatisfactory attempt meeting the requirements. The grading scale starts at 100 and ends at 50. I gave you 50 points so do your best. Points Grade 6 100 5.5 96 5 92 4.5 88 4 84 3.5 80 3 76 2.5 72 2 68 1.5 64 1 60 .5 56 0 50 |
Enjoy This Pyramid Slide Show Below
Enjoy This Obelisk Slide Show Below
"Do not forget to post all your artwork, grades, and reflections on your blog page"
-----------------------------------------------------------------------------------------------------------------------------------------------------------------------------------------------------------------------------------------------------------------------------------------------------------------------------------------------------------------------------------------------------------------------------------------------------------------------------------------------------------------------------------------
-----------------------------------------------------------------------------------------------------------------------------------------------------------------------------------------------------------------------------------------------------------------------------------------------------------------------------------------------------------------------------------------------------------------------------------------------------------------------------------------------------------------------------------------
Independent Study Pinch Pot Box
Directions:
You are on your own
independent study (You do You)
You will design all aspects of your box the way you want.
Any shape is possible.
If you have the idea I can help you figure out how to build. (first thing is to start with a drawing)
You are on your own
independent study (You do You)
You will design all aspects of your box the way you want.
Any shape is possible.
If you have the idea I can help you figure out how to build. (first thing is to start with a drawing)
|
Independent Study Pinch Pot
|
Grading scale
A full point is earned by meeting each requirement on the rubric. There will be 6 requirements for each art project. A half point (.5) is earned by attempting and not meeting the requirement. Zero points are earned for an unsatisfactory attempt meeting the requirements. The grading scale starts at 100 and ends at 50. I gave you 50 points so do your best. Points Grade 6 100 5.5 96 5 92 4.5 88 4 84 3.5 80 3 76 2.5 72 2 68 1.5 64 1 60 .5 56 0 50 |
"Do not forget to post all your artwork, grades, and reflections on your blog page"
------------------------------------------------------------------------------------------------------------------------------------------------------------------------------------
Pumpkin Pinch Pot
|
Directions
1. On a sheet of paper design your jack-lantern. Draw 6-8 different faces to carve on your pumpkin. 2. To start you will a ball of clay as big as a large grape fruit or soft ball. 3. Split the clay in half and make two equal balls. 4. Pinch out two bowl shapes and join them together. 5. Add the stem of the pumpkin. 6. Paddle or carve the form to create the lines of the pumpkin (use the long edge of the paddle and stamp the lines) 7.Smooth the outside. 8. Cut the opening for the jack-lantern and smooth the inside. 9. Draw your design then carve it out. 10. You can under-glaze your project now 11.When you are finished take a picture of your project and upload it to your gallery. 12. On your blog create a new post and grade your project. Upload your image and write why you deserve the grade your grade. |
Rubric
Student successfully demonstrates joining two pinch pots together. Student successfully demonstrates forming a pumpkin shape. Student successfully demonstrates burnishing the inside and outside of the pinch pot. Student successfully demonstrates carving their pumpkin. Student successfully demonstrates creatively making the lid. The student successfully demonstrated craftsmanship. Grading scale A full point is earned by meeting each requirement on the rubric. There will be 6 requirements for each art project. A half point (.5) is earned by attempting and not meeting the requirement. Zero points are earned for an unsatisfactory attempt meeting the requirements. The grading scale starts at 100 and ends at 50. I gave you 50 points so do your best. Points Grade 6 100 5.5 96 5 92 4.5 88 4 84 3.5 80 3 76 2.5 72 2 68 1.5 64 1 60 .5 56 0 50 |
Slide Show Images
Scroll and Enjoy
Scroll and Enjoy
"Do not forget to post all your artwork, grades, and reflections on your blog page"
------------------------------------------------------------------------------------------------------------------------------------------------------------------------------------
Dia de los Muertos—the Day of the Dead
|
Research and answer the following questions
Find 10 images of skulls and images inspired by "Dia de los Muertos—the Day of the Dead". Save your images to your computer. What is Dia de los Muertos--the Day of the Dead? Where does the celebration of Dia de los Muertos--the Day of the Dead take place? When did the holiday start? What is the inspiration for the Dia de los Muertos artwork. Design 6 images on an 8.5 X 11 sheet of paper. ( Skull and tattoos)( use colored pencil) On your blog, post your research, answers, images, drawings, and grade. Directions
|
Rubric
Grading scale
A full point is earned by meeting each requirement on the rubric. There will be 6 requirements for each art project. A half point (.5) is earned by attempting and not meeting the requirement. Zero points are earned for an unsatisfactory attempt meeting the requirements. The grading scale starts at 100 and ends at 50. I gave you 50 points so do your best. Points Grade 6 100 5.5 96 5 92 4.5 88 4 84 3.5 80 3 76 2.5 72 2 68 1.5 64 1 60 .5 56 0 50 |
Slide Show Images
Scroll and Enjoy
click the buttons to view videos
ENJOY
ENJOY
"Do not forget to post all your artwork, grades, and reflections on your blog page"
------------------------------------------------------------------------------------------------------------------------------------------------------------------------------
NC Pottery
|
Rubric
A full point is earned by meeting each requirement on the rubric. There will be 6 requirements for each art project. A half point (.5) is earned by attempting and not meeting the requirement. Zero points are earned for an unsatisfactory attempt meeting the requirements. The grading scale starts at 100 and ends at 50. I gave you 50 points so do your best. Points Grade 6 100 5.5 96 5 92 4.5 88 4 84 3.5 80 3 76 2.5 72 2 68 1.5 64 1 60 .5 56 0 50 |
Click buttons below to watch videos and read about folk pottery
Enjoy looking at some historical, global, and contemporary vessels similar to N.C folk art.

Monkey Vessel 10th–13th centuryMixtec
The ancient Mexicans used many kinds of stone for the manufacture of ritual and sumptuary objects. Onyx marble, of which this vessel is carved, occurs in many parts of Mexico, where it is known as tecali. During the florescence of the great city of Teotihuacan in the first half of the first millennium A.D., tecali was used primarily to carve masks. Centuries later, perhaps a result of improved carving skills, lapidary artists were able to produce vessels from it, some plain and some effigy figures as here. A frequent subject of such bowls is a monkey holding its tail above its head. The vessel retains its globular form, the limbs, head, and tail projecting from it abruptly. The interior of the container was laboriously hollowed out with tubular drills, probably of bamboo, and then polished smooth. The eyes and teeth are inlaid with shell and obsidian. The function or meaning of the image is not known, although monkeys feature in creation myths of the Maya and Aztecs and were perceived as the originators of the performing and visual arts, perhaps because of their entertaining behavior.https://collectionapi.metmuseum.org/api/collection/v1/iiif/313348/657881/main-image
|
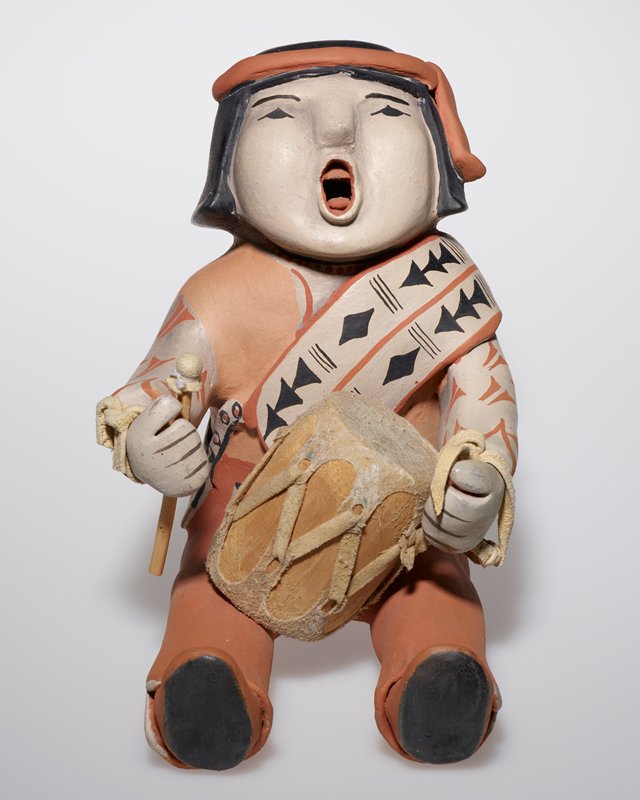
Artist: Ada Suina
Storyteller FigureCeramic, pigment, wood, animal hide January 5, 1980 https://collections.artsmia.org/art/83374/storyteller-figure-ada-suina |

|
Inca Portrait Head Kero — Peru
1400 AD - 1550 AD An exceedingly rare Inca portrait kero (cup/goblet) from the north coast of Peru. Nicely sculpted and polychrome painted in shades of red, cream white and black. His face shows a partially open mouth with teeth exposed and wearing a small a nose ornament. The spout and underside of the rim are decorated with linear geometric designs. Although few of this type are known to exist, it is thought they represent actual people; a ruler, shaman or individual of high social status. In poor condition. The face, one ear and front spout are original, but the neck, base, back of the head and rear spout area have been replaced and restored to match. Light surface wear and scattered deposits present. Despite considerable restoration, it is an exceptional example that appears intact and complete. Ex. V. Hansen collection, FL. Acquired from Michael Cichon Tribal Arts Gallery. Approx. 4.5" tall x 4" across. http://www.ancientartifax.com/precol.htm $425 |
|
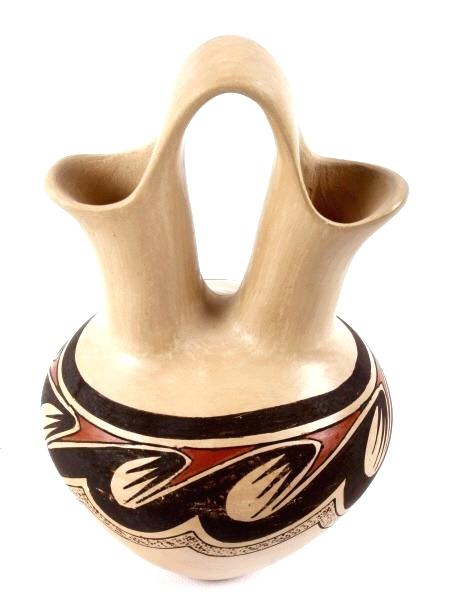
Indian Wedding Vase
http://planetromney.org/space/ |
"Do not forget to post all your artwork, grades, and reflections on your blog page"
---------------------------------------------------------------------------------------------------------------------------------------------------------------------------------------------------------------------------------------------------------------------
Aztec Tri-Pod Vessel
Directions
- Review the images in the slideshow below.
- Watch the videos below to learn about the forms.
- Research other images online to get inspired.
- You may build a vase or a small bowl.
- The vessels should have geometric continuous pattern.
- The vessel should incorporate 3 feet to support the form.
- Research and design the shape and images on a 8" x 11" sheet of paper. (make several small drawings and pick the best one.
- You must post your sketches with your finished project.
- Use the coil and pinch technique to build your vessel.
- Use under-glazes to paint your designs.
- You should use the additive and subtraction method of sculpting your vessel . (carving and adding clay)
- The form should be a minimum of 9" tall or 9" round .
- Take a picture of design drawings and post on your blog.
- Take a picture of your completed vessel and post on your blog.
- Grade your project and defend the reason for your grade on your blog. You must use a minimum of three sentences.
|
Rubric
|
Grading scale
A full point is earned by meeting each requirement on the rubric. There will be 6 requirements for each art project. A half point (.5) is earned by attempting and not meeting the requirement. Zero points are earned for an unsatisfactory attempt meeting the requirements. The grading scale starts at 100 and ends at 50. I gave you 50 points so do your best. Points Grade 6 100 5.5 96 5 92 4.5 88 4 84 3.5 80 3 76 2.5 72 2 68 1.5 64 1 60 .5 56 0 50 |
The pottery of the Aztecs (1325 AD – 1521 AD) was extremely varied. They made all types of earthenware, plates, jugs, cups, pots, mostly with red and orange clay. The Mixtecs stood out for their polychrome lacquer ceramics, in which after polishing a piece, they would cover it with white stucco and then paint it.
Image Sources
https://www.metmuseum.org/art/collection/search/312586?&searchField=All&sortBy=Relevance&ft=Teotihuacan&offset=0&rpp=20&pos=6
https://collections.artsmia.org/art/751
Pre-Columbian, from the Guanacaste Nicoya area of Costa Rica dating ca. 1000 - 1500 AD. Decorated pottery bowl sits upon three hollow, avian-shaped rattle legs (rattles in place and working!). Colors are still bright and true. 6"D x 3-1/4", inner rim chip and minor rim roughness, else intact.
https://www.icollector.com/A-Costa-Rican-Polychrome-Tripod-Bowl-Rattle-Legs_i13860508
Plate
https://collectionapi.metmuseum.org/api/collection/v1/iiif/316274/667187/main-image
"Do not forget to post all your artwork, grades, and reflections on your blog page"
------------------------------------------------------------------------------------------------------------------------------------------------------------------------------------------------------------------------------------------------------------------------------------------------------------------------------------------------------------------------------------------------------------------------------------------------------------------------------
NATIVE AMERICAN WEDDING VASE
The Wedding Vase is an ancient vessel still used in traditional Native American wedding ceremonies.
One spout of the vessel represents the husband; the other, the wife. The looped handle represents the
unity achieved with marriage.
The space created within the loop represents the couples’ own circle of life. The wedding vase is a treasured and a sacred tradition among many Native American Indian tribes, particularly the Navajo and Pueblo peoples. These vases are not only symbolic in the ceremony performed just prior to the wedding itself, but also in the shape and construction of the vessel. About a week or two before a couple is officially married, the groom’s
parents build the wedding vase from clay found in a local river bed and ceremonially cleaned and filtered. Once the vessel has been properly fired, both families assemble. The parents give the young couple advice, and
the wedding vase is filled with a special liquid. Traditionally it would be a
nectar made by the medicine man, though many modern couples may
choose to drink water or an herbal infused tea from the vase to represent
the blending of their lives. First the groom offers his bride the vessel and she drinks from one spout.
She then turns the wedding vase clockwise, and the groom then drinks
from this same side. Each will then drink from the opposite side of
the wedding vase, and then finally in the culmination of the ceremony,
they will both drink from the wedding vase together. It is said that if they
manage this feat without spilling a drop they will always have a strong,
cooperative relationship. The vase then becomes a cherished piece in their
household and great care is taken to make sure it is never damaged.
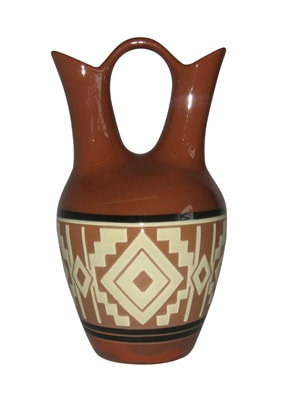
The vessel itself is quite beautiful, and its design is an integral part of its meaning.
The two spouts represent the couple; one the bride, the other the groom.
The rounded base and shared reservoir of the vase represent the couple’s
now-shared lives. The looped handle also represents this unity in a more visible
and apparent way, much like a wedding band is a visible reminder of the deeper,
spiritual connection shared by a husband and wife.The handle creates a circle
in the center of the vase that represents the circle of life
One spout of the vessel represents the husband; the other, the wife. The looped handle represents the
unity achieved with marriage.
The space created within the loop represents the couples’ own circle of life. The wedding vase is a treasured and a sacred tradition among many Native American Indian tribes, particularly the Navajo and Pueblo peoples. These vases are not only symbolic in the ceremony performed just prior to the wedding itself, but also in the shape and construction of the vessel. About a week or two before a couple is officially married, the groom’s
parents build the wedding vase from clay found in a local river bed and ceremonially cleaned and filtered. Once the vessel has been properly fired, both families assemble. The parents give the young couple advice, and
the wedding vase is filled with a special liquid. Traditionally it would be a
nectar made by the medicine man, though many modern couples may
choose to drink water or an herbal infused tea from the vase to represent
the blending of their lives. First the groom offers his bride the vessel and she drinks from one spout.
She then turns the wedding vase clockwise, and the groom then drinks
from this same side. Each will then drink from the opposite side of
the wedding vase, and then finally in the culmination of the ceremony,
they will both drink from the wedding vase together. It is said that if they
manage this feat without spilling a drop they will always have a strong,
cooperative relationship. The vase then becomes a cherished piece in their
household and great care is taken to make sure it is never damaged.
The vessel itself is quite beautiful, and its design is an integral part of its meaning.
The two spouts represent the couple; one the bride, the other the groom.
The rounded base and shared reservoir of the vase represent the couple’s
now-shared lives. The looped handle also represents this unity in a more visible
and apparent way, much like a wedding band is a visible reminder of the deeper,
spiritual connection shared by a husband and wife.The handle creates a circle
in the center of the vase that represents the circle of life
Directions
- Review the images in the slideshow below.
- Do not copy the images from the slideshow. I need you to get inspired by them and design your own vessel.
- Watch the videos below to learn about the forms.
- Research other images online to get inspired.
- You will build a small vase .
- Start the vase with a medium size pinch pot.
- Use coils to create the spouts and handles.
- The vessel should have a geometric continuous pattern or shield pattern.
- Research and design the shape and images on a 8" x 11" sheet of paper. (make several small drawings and pick the best one.
- Practice drawing your patterns.
- You must post your sketches with your finished project.
- Use the coil and pinch technique to build your vessel.
- Use under-glazes to paint your designs.
- Carve or scratch your designs out with a small carving tool.
- You should use the additive and subtraction method of sculpting your vessel . (carving and adding clay)
- The form should be a minimum of 9" tall .
- Take a picture of design drawings and post on your blog.
- Take a picture of your completed vessel and post on your blog.
- Grade your project and defend the reason for your grade on your blog. You must use a minimum of three sentences.
|
Rubric
|
Grading scale
A full point is earned by meeting each requirement on the rubric. There will be 6 requirements for each art project. A half point (.5) is earned by attempting and not meeting the requirement. Zero points are earned for an unsatisfactory attempt meeting the requirements. The grading scale starts at 100 and ends at 50. I gave you 50 points so do your best. Points Grade 6 100 5.5 96 5 92 4.5 88 4 84 3.5 80 3 76 2.5 72 2 68 1.5 64 1 60 .5 56 0 50 |
"Do not forget to post all your drawings, artwork, grades, and reflections on your blog page"
------------------------------------------------------------------------------------------------------------------------------------------------------------------------------------------------------------------------------------------------------------------------------------------------------------------------------------------------------------------------------------------------------------------------------------------------------------------------------
Ceramic Globe
Directions
- Review the images in the slideshow below.
- Do not copy the images from the slideshow. I need you to get inspired by them and design your own vessel.
- Watch the videos below to learn about the forms.
- Research other images online to get inspired.
- Research and design the shape and images on a 8" x 11" sheet of paper. (make several small drawings and pick the best one.
- Practice drawing your vessel and designs
- You must post your sketches with your finished project.
- You will build a small vase . The vase must be thin.
- Use the coil and pinch technique to build your vessel.
- Start the vase with a medium size pinch pot.
- Use coils to make an aesthetically pleasing shape.
- The vessel should have a a pastern of small holes you create. Create the holes by using the hole making tool.
- You may use the the hole making tool to create images.
- The vessel needs to be thin.
- You must leave a small opening at the top.
- Cut a small opening in the bottom on the back side. This will allow you to place a tea light inside your vessel
- You do not have to use under-glaze on this project.
- You may carve designs out with a small carving tool around your holes.
- The form should be a minimum of 9" tall .
- Take a picture of design drawings and post on your blog.
- Take a picture of your completed vessel and post on your blog.
- Grade your project and defend the reason for your grade on your blog. You must use a minimum of three sentences.
Video links to watch
Slide show for design ideas (no copying )
|
Rubric
|
Grading scale
A full point is earned by meeting each requirement on the rubric. There will be 6 requirements for each art project. A half point (.5) is earned by attempting and not meeting the requirement. Zero points are earned for an unsatisfactory attempt meeting the requirements. The grading scale starts at 100 and ends at 50. I gave you 50 points so do your best. Points Grade 6 100 5.5 96 5 92 4.5 88 4 84 3.5 80 3 76 2.5 72 2 68 1.5 64 1 60 .5 56 0 50 |
"Do not forget to post all your drawings, artwork, grades, and reflections on your blog page"
------------------------------------------------------------------------------------------------------------------------------------------------------------------------------------------------------------------------------------------------------------------------------------------------------------------------------------------------------------------------------------------------------------------------------------------------------------------------------
Foot, Belly, Shoulder, Neck, Lip, Handle, and Carving Vase
Directions
- Review the images in the slideshow below.
- Do not copy the images from the slideshow. I need you to get inspired by them and design your own vessel.
- Watch the videos below to learn about the forms.
- Research other images online to get inspired.
- Research and design the shape and images on a 8" x 11" sheet of paper. (make several small drawings and pick the best one.
- Practice drawing your vessel and designs
- You must post your sketches with your finished project.
- You will build a small vase . The vase must be thin.
- The form should be a minimum of 9" tall .
- Use the coil and pinch technique to build your vessel.
- Start the vase with a medium size pinch pot.
- Use coils to make an aesthetically pleasing shape.
- The vessel should have a caved pastern.
- The vessel needs to be thin.
- You do not have to use under-glaze on this project.
- Take a picture of design drawings and post on your blog.
- Take a picture of your completed vessel and post on your blog.
- Grade your project and defend the reason for your grade on your blog. You must use a minimum of three sentences.
|
Rubric
|
Grading scale
A full point is earned by meeting each requirement on the rubric. There will be 6 requirements for each art project. A half point (.5) is earned by attempting and not meeting the requirement. Zero points are earned for an unsatisfactory attempt meeting the requirements. The grading scale starts at 100 and ends at 50. I gave you 50 points so do your best. Points Grade 6 100 5.5 96 5 92 4.5 88 4 84 3.5 80 3 76 2.5 72 2 68 1.5 64 1 60 .5 56 0 50 |
"Do not forget to post all your drawings, artwork, grades, and reflections on your blog page"
------------------------------------------------------------------------------------------------------------------------------------------------------------------------------------------------------------------------------------------------------------------------------------------------------------------------------------------------------------
